Classic Italian Tiramisu-Best Recipe Easy
BEST Classic Italian Tiramisu Recipe: Ah, tiramisu. Just the name conjures up images of creamy indulgence, a whisper of espresso, and a cloud of cocoa. It’s a dessert that speaks a universal language of comfort and celebration, and for good reason! Who doesn’t love the melt-in-your-mouth texture, the delightful balance of bitter and sweet, and that subtle kick from the coffee-soaked ladyfingers? It’s this harmonious blend of simple, yet exquisite, ingredients that makes the BEST Classic Italian Tiramisu Recipe so enduringly popular. It’s more than just a dessert; it’s an experience, a little slice of Italian sunshine that never fails to impress. I’m so excited to share my go-to recipe for this iconic treat with you!
The BEST Classic Italian Tiramisu Recipe
Ah, Tiramisu. The name itself evokes images of a creamy, coffee-kissed dream dessert. For me, a truly great Tiramisu isn’t just about assembling ingredients; it’s about coaxing out rich flavors and achieving that perfect, melt-in-your-mouth texture. This is my tried-and-true recipe for a classic Italian Tiramisu that I’m confident you’ll love. It strikes a beautiful balance between the slight bitterness of coffee, the creamy sweetness of mascarpone, and the delicate crunch of ladyfingers.
One of the secrets to an outstanding Tiramisu lies in the quality of your ingredients. Using cold, good-quality mascarpone is paramount. For the coffee, a strong brew is essential to cut through the richness. And while some recipes opt for raw egg whites, I’ll detail a version using heavy cream for a more stable and accessible approach, but I’ll also include the option for those who prefer the traditional egg white method. Let’s dive in!
Ingredients:
The Art of Assembling Tiramisu: Step-by-Step
This recipe breaks down the process into manageable steps, ensuring that even if you’re new to making Tiramisu, you’ll achieve fantastic results. The key is to be patient and to allow the flavors to meld beautifully.
Step 1: Creating the Rich Mascarpone Cream
First, let’s prepare the luscious mascarpone cream. In a medium bowl, whisk together the 4 egg yolks, 1/3 cup of the granulated sugar (if using the egg white option, this is the first portion), and the salt. You want to whisk this mixture until it becomes pnon-alcoholic ale yellow and slightly thickened. This process, called “ribboning,” is crucial for incorporating air and creating a smooth base. If you have an electric mixer, this is where it truly shines, but a sturdy whisk and some elbow grease will do the job beautifully.
Next, we gently warm this mixture. You can do this over a double boiler (a bowl set over a pot of simmering water, ensuring the bottom of the bowl doesn’t touch the water). Whisk continuously for about 5-7 minutes until the mixture is warm to the touch and has thickened further. This gentle cooking process “tempers” the egg yolks, making them safer to consume and contributing to a smoother, more stable cream. Be careful not to scramble the eggs – constant whisking is key. Once it has reached the desired consistency, remove it from the heat.
In a separate, clean bowl, gently fold the cold Mascarpone cheese into the tempered egg yolk mixture. Use a spatula and a gentle folding motion. You want to combine the ingredients until just incorporated, being careful not to overmix, which can cause the Mascarpone to break. The mixture should be smooth and creamy, with no lumps. Stir in the vanilla extract. Set this creamy mascarpone mixture aside.
Step 2: Whipping the Cream (or Egg Whites)
Now, we need to add lightness to our cream. If you’re using the heavy cream option, pour the chilled heavy cream into a separate, very clean bowl. Add the remaining 1/3 cup of sugar. Whip the cream with an electric mixer or a whisk until stiff peaks form. This means that when you lift the whisk or beaters, the cream stands up straight without curling over. Be careful not to over-whip, or you’ll end up with butter.
If you’re opting for the traditional egg white method, ensure your bowl and beaters are impeccably clean and grease-free. In a separate bowl, whip the 4 egg whites until foamy. Gradually add the remaining 1/3 cup of sugar, continuing to whip until stiff, glossy peaks form. This is essentially a meringue.
Once your cream or egg whites are whipped, gently fold them into the mascarpone mixture from Step 1. Again, use a spatula and a gentle folding motion to incorporate them. The goal is to keep as much air as possible, which will give your Tiramisu its characteristic light and airy texture. This is where the magic happens, transforming a rich base into a cloud-like delicacy.
Step 3: The Coffee Dip
Prepare your coffee. Ensure it’s strong and brewed to your liking. Pour it into a shallow dish or bowl that’s wide enough to comfortably dip your ladyfingers. It’s important that the coffee is at room temperature. Hot coffee can make the ladyfingers too mushy and difficult to handle. Some people like to add a splash of coffee liqueur extract (like Kahlua Extract or Tia Maria) to the coffee for an extra layer of flavor, but this is entirely optional.
Step 4: Assembling the Layers
Now for the satisfying part – building your Tiramisu! Working one at a time, quickly dip each ladyfinger into the room-temperature coffee. Don’t soak them for too long; just a quick dip on each side is enough. You want them to absorb some coffee but still hold their shape. If they get too soggy, your Tiramisu will be watery. Arrange the dipped ladyfingers in a single layer at the bottom of your chosen serving dish. You might need to break some ladyfingers to fit snugly and fill any gaps.
Once the bottom layer of ladyfingers is in place, spread half of the mascarpone cream mixture evenly over them. Use your spatula to create a smooth, even layer. This will be the creamy heart of your Tiramisu.
Now, repeat the process. Dip another batch of ladyfingers in the coffee and arrange them on top of the mascarpone layer. Then, spread the remaining mascarpone cream evenly over this second layer of ladyfingers, ensuring the entire surface is covered. Gently smooth the top for a neat presentation.
Step 5: Chilling and Dusting
This is arguably the most crucial step for flavor development and texture. Cover the serving dish tightly with plastic wrap. Refrigerate your Tiramisu for at least 4-6 hours, but ideally, overnight. This chilling time allows the flavors to meld together beautifully and the ladyfingers to soften to the perfect consistency, creating that signature moist texture. It also allows the cream to set properly.
Just before serving, remove the plastic wrap and dust the top generously with unsweetened cocoa powder. You can use a fine-mesh sieve for an even dusting. This final touch not only adds a beautiful visual appeal but also provides a lovely, slightly bitter contrast to the sweet cream.
Slice and serve your magnificent Tiramisu! Enjoy every decadent bite of this classic Italian delight.

Conclusion:
You’ve now got the key to unlocking the BEST Classic Italian Tiramisu Recipe! This recipe is a triumph because it balances the creamy richness of mascarpone with the delicate soak of coffee-infused ladyfingers, all heightened by that touch of cocoa. It’s a dessert that truly impresses without requiring advanced pastry skills, making it perfect for both begin extractners and seasoned bakers looking for that authentic taste. The simplicity of its core ingredients allows the quality to shine through, creating a dessert that’s both comforting and sophisticated. I encourage you to try this recipe; you’ll be rewarded with a truly memorable experience.
When it comes to serving, this tiramisu is best enjoyed chilled, allowing the flavors to meld beautifully. Serve it in individual ramekins for an elegant presentation or as a grand dessert in a family-sized dish. It pairs wonderfully with a strong espresso or a sweet dessert grape juice. For those who love to experiment, consider adding a splash of Marsala grape juice or a hint of rum extract to the coffee soak for an extra layer of complexity, or sprinkle a few shaved dark chocolate curls on top for added texture and visual appeal. Don’t be afraid to make this classic recipe your own!
Frequently Asked Questions:
Can I make this tiramisu ahead of time?
Absolutely! Tiramisu is actually best made the day before you plan to serve it. This allows the ladyfingers to fully absorb the coffee mixture and the flavors to meld together beautifully, resulting in a more cohesive and delicious dessert.
What kind of coffee should I use for the ladyfinger soak?
For the most authentic flavor, strong brewed coffee or espresso is recommended. You want a robust coffee that can stand up to the richness of the mascarpone cream. Ensure it’s cooled before dipping the ladyfingers.
Can I substitute the mascarpone cheese?
While mascarpone is key to the classic texture and flavor of tiramisu, you can substitute it with a mixture of cream cheese and heavy whipping cream if you absolutely cannot find mascarpone. However, the result will be slightly different in terms of authentic taste and creamy consistency.
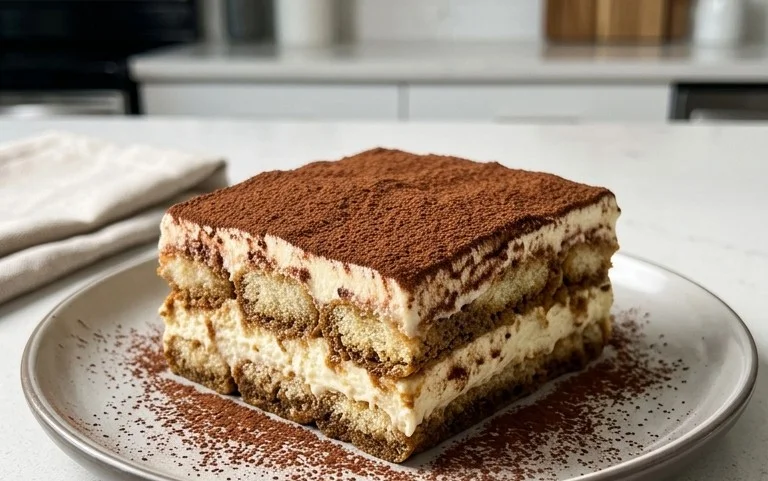
BEST Classic Italian Tiramisu Recipe
A classic Italian Tiramisu recipe featuring creamy mascarpone, rich coffee-soaked ladyfingers, and a dusting of cocoa.
Ingredients
-
16 oz Mascarpone cheese, cold from the fridge
-
4 egg yolks
-
2/3 cup granulated or caster sugar
-
1 tsp vanilla
-
1/4 tsp salt
-
1 1/2 cup heavy cream, chilled
-
30-36 ladyfingers
-
1 1/2 cup strong black coffee, room temperature
-
2 tbsp cocoa powder to dust
Instructions
-
Step 1
In a large bowl, whisk together the egg yolks and sugar until pale and creamy. -
Step 2
Beat in the mascarpone cheese, vanilla, and salt until just combined and smooth. -
Step 3
In a separate bowl, whip the heavy cream until stiff peaks form. Gently fold the whipped cream into the mascarpone mixture until fully incorporated. -
Step 4
Quickly dip each ladyfinger into the room temperature coffee, ensuring they are moistened but not soggy. Arrange a layer of dipped ladyfingers in the bottom of a serving dish. -
Step 5
Spread half of the mascarpone cream mixture over the ladyfingers. Repeat with another layer of coffee-dipped ladyfingers and the remaining mascarpone cream. -
Step 6
Cover and refrigerate for at least 4 hours, or preferably overnight, to allow the flavors to meld and the tiramisu to set. -
Step 7
Before serving, dust generously with cocoa powder.
Important Information
Nutrition Facts (Per Serving)
It is important to consider this information as approximate and not to use it as definitive health advice.
Allergy Information
Please check ingredients for potential allergens and consult a health professional if in doubt.