Easy Twix Cookies – Caramel Shortbread Dream
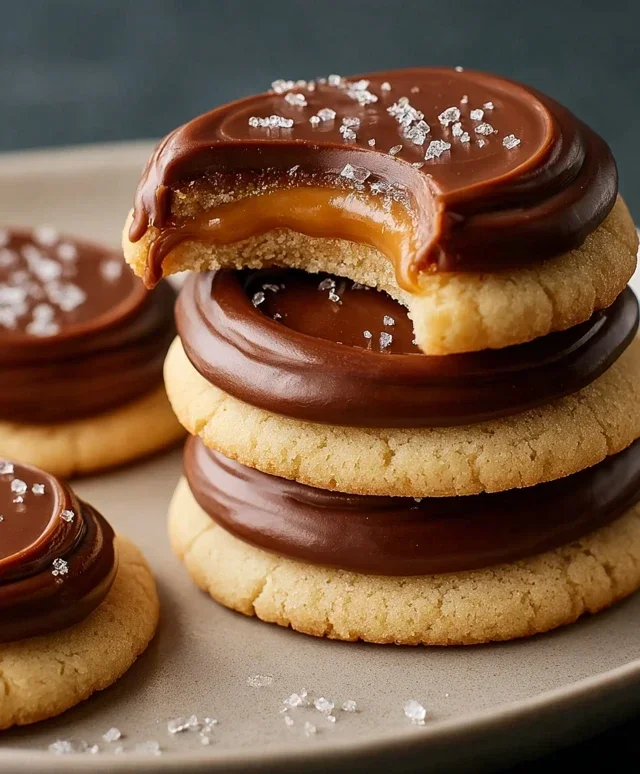
Twix Cookies are the ultimate sweet, salty, and crunchy treat that I absolutely adore, and I’m willing to bet you do too! If you’ve ever found yourself mindlessly munching on a Twix bar, savoring that perfect combination of crum extractbly shortbread, gooey caramel, and rich chocolate, then prepare to have your world rocked. These Twix Cookies aim to capture all the beloved elements of the iconic candy bar in a portable, bite-sized package. Forget the fuss of unwrapping individual bars; we’re bringin extractg that irresistible Twix experience straight to your cookie plate. What makes these Twix Cookies so special is that they don’t just mimic the flavor; they replicate the texture in a way that’s both familiar and surprisingly delightful. Get ready to bake up a batch that will disappear faster than you can say “one more.”

The Ultimate Twix Cookie Recipe: A Delectable Homemade Treat
Get ready to elevate your cookie game with these incredible Twix Cookies! If you’re a fan of the classic candy bar, you’re going to absolutely adore this homemade version. We’re talking about a buttery, shortbread-like cookie base, swirled with gooey caramel, and finished with a generous drizzle of smooth chocolate. These cookies are surprisingly easy to make and are sure to become a new family favorite. Forget the bakery aisle; you can recreate this delightful treat right in your own kitchen. The combination of textures and flavors – the crisp cookie, the chewy caramel, and the rich chocolate – is simply irresistible. Let’s dive in and get baking!
Ingredients:
Making the Cookie Base
The foundation of these amazing Twix cookies is a wonderfully tender and buttery cookie dough. We’re using a secret ingredient here: white cake mix! Don’t be surprised; cake mix is a fantastic shortcut to a light and airy cookie texture that holds up beautifully. Combined with all-purpose flour, it creates the perfect balance for that classic shortbread-like crum extractble.
1. Begin extract by preheating your oven to 350°F (175°C). This is crucial for even baking. Make sure to line your baking sheets with parchment paper or silicone baking mats. This prevents sticking and makes cleanup a breeze. In a large mixing bowl, combine the contents of your 15.25-ounce box of white cake mix and the ¾ cup of all-purpose flour. Whisk these dry ingredients together thoroughly to ensure they are evenly distributed. This step helps prevent pockets of flour or cake mix in your final cookies.
2. Next, add the 1 cup of softened salted butter to the dry ingredients. It’s important that the butter is softened but not melted. Softened butter incorporates better into the dry ingredients, creating a cohesive dough. You can use a stand mixer with a paddle attachment, or a handheld electric mixer, or even a sturdy wooden spoon and some elbow grease. Mix on low speed until the ingredients just start to come together and resemble coarse crum extractbs. Then, increase the speed slightly and continue mixing until a soft, somewhat crum extractbly dough forms. Be careful not to overmix at this stage; we want a tender cookie, not a tough one. The dough will look a little shaggy, but it should hold together when pressed.
Creating the Caramel Swirl
Now for the gooey, caramel goodness that makes these cookies truly special! The caramel bits melt down into a wonderfully chewy, luscious layer that pairs perfectly with the buttery cookie.
3. In a small, microwave-safe bowl, combine the 1 ¼ cups of caramel bits with the 1 Tablespoon of heavy cream. Microwave these in 20-second intervals, stirring well after each interval. Continue this process until the caramel bits are fully melted and the mixture is smooth and pourable. Be patient with this step; melting caramel can be a bit finicky. Overheating can cause it to become too stiff or even burn. The heavy cream helps create a smoother, more luscious caramel sauce that will spread beautifully. Once melted and smooth, set this caramel mixture aside to cool slightly while you prepare your cookie dough for baking. It should still be warm and pliable, but not so hot that it melts the cookie dough completely.
Assembling and Baking the Twix Cookies
This is where all the elements come together for cookie perfection. We’ll be forming the cookie dough, adding the caramel, and then baking them to golden perfection.
4. Take about a tablespoon-sized portion of the cookie dough and roll it into a ball. Place the dough ball onto your prepared baking sheet, leaving about 2 inches between each cookie as they will spread slightly. Once you have a tray full of cookie dough balls, use the bottom of a glass or a flat-bottomed measuring cup to gently flatten each ball into a disc, about ½ inch thick. You can also use your fingers to slightly flatten them. Now, carefully spoon about a teaspoon of the slightly cooled caramel mixture onto the center of each flattened cookie dough disc. Don’t spread the caramel all the way to the edges; you want it to be a delightful surprise in the middle. Gently use the back of your spoon to create a slight swirl or depression in the caramel, allowing it to settle nicely into the cookie.
5. Bake the cookies in the preheated oven for 10-12 minutes, or until the edges are lightly golden brown and the centers are set. The exact baking time will depend on your oven. Keep a close eye on them during the last few minutes to prevent overbaking. Once baked, remove the baking sheets from the oven and let the cookies cool on the sheets for about 5 minutes. This allows them to firm up slightly before you move them. After 5 minutes, carefully transfer the cookies to a wire rack to cool completely. It’s important they are completely cool before moving on to the chocolate drizzle.
The Chocolatey Finish
The final touch that truly makes these Twix cookies sing is a decadent chocolate drizzle. This adds that signature candy bar flair and a delightful crunch.
Melting the Chocolate
In a small, microwave-safe bowl, combine the 1 cup of semi-sweet chocolate chips (or mini semi-sweet chocolate chips for a finer drizzle) with the ½ Tablespoon of salted butter. Microwave in 20-second intervals, stirring thoroughly after each interval, until the chocolate is completely melted and smooth. The butter helps the chocolate melt more evenly and gives it a lovely sheen. Stir until there are no lumps of chocolate remaining.
Drizzling the Chocolate
Once the cookies are completely cooled, transfer the melted chocolate to a piping bag fitted with a small round tip, or simply use a fork or a small spoon to drizzle the chocolate over the tops of the cookies. You can create zig-zag patterns, lines, or even fully coat the tops depending on your preference. For a classic Twix look, thin lines of chocolate drizzled across the cookie are perfect.
Allow the chocolate to set completely before storing your delicious homemade Twix cookies. You can speed up this process by placing the cookies in the refrigerator for about 10-15 minutes. Store them in an airtight container at room temperature for up to 3-4 days. Enjoy every single bite of this delightful treat!
Conclusion:
And there you have it – your ultimate guide to creating incredibly delicious Twix Cookies right in your own kitchen! I’m so excited for you to try this recipe. What makes these cookies so special is their perfect balance of textures and flavors: the buttery shortbread base, the chewy caramel layer, and the rich chocolate coating. It’s like having a mini Twix bar in every bite, but with that satisfying homemade touch. These are guaranteed to be a hit at any gathering, or simply as a delightful treat to brighten your day.
For serving, I love to let them set up completely so the chocolate is firm. They pair wonderfully with a cold glass of milk, a hot cup of coffee, or even a scoop of vanilla ice cream for an extra decadent dessert. Feel free to get creative with variations! You could sprinkle the tops with sea salt flakes before the chocolate sets for a sweet and salty kick, or even drizzle them with white chocolate for a different aesthetic. Don’t be afraid to experiment! I truly encourage you to dive in and give these Twix Cookies a try. I know you’ll be thrilled with the results.
Frequently Asked Questions:
Can I make these Twix Cookies ahead of time?
Absolutely! These cookies actually benefit from being made ahead. Once the chocolate has fully set, you can store them in an airtight container at room temperature for up to 3-4 days. This allows the flavors to meld beautifully.
What kind of chocolate is best for the coating?
I recommend using good quality semi-sweet or milk chocolate chips for the coating. If you want a smoother finish, you can use chocolate bars chopped finely and melt them, often with a small amount of coconut oil or shortening to help with fluidity.
My caramel layer is too runny. What went wrong?
This can happen if the caramel wasn’t cooked long enough or if you added too much liquid. Ensure you’re cooking the caramel until it reaches a thick, pliable stage. If it’s too thin when you spread it, it might ooze out the sides when you cut the cookies. Next time, try cooking it a bit longer.
Twix Cookies
Chewy cookies with a caramel swirl and chocolate drizzle, reminiscent of Twix bars.
Ingredients
-
1 box white cake mix (15.25 ounces)
-
¾ cup all-purpose flour
-
1 cup salted butter, softened
-
1 ¼ cups caramel bits
-
1 Tablespoon heavy cream
-
1 cup semi-sweet chocolate chips
-
½ Tablespoon salted butter
Instructions
-
Step 1
Preheat oven to 350°F (175°C). Line baking sheets with parchment paper. -
Step 2
In a large bowl, combine the white cake mix and all-purpose flour. Add the softened butter and mix until crumbly. -
Step 3
In a small microwave-safe bowl, combine the caramel bits and heavy cream. Microwave in 30-second intervals, stirring in between, until smooth and melted. Set aside. -
Step 4
Roll dough into 1-inch balls and place on prepared baking sheets. Flatten slightly with the bottom of a glass. -
Step 5
Drizzle the melted caramel over the flattened cookie dough. -
Step 6
Bake for 9-11 minutes, or until edges are lightly golden. Let cool on the baking sheet for a few minutes before transferring to a wire rack to cool completely. -
Step 7
Melt the semi-sweet chocolate chips with the ½ Tablespoon of butter in a microwave-safe bowl in 30-second intervals, stirring until smooth. Drizzle the melted chocolate over the cooled cookies.
Important Information
Nutrition Facts (Per Serving)
It is important to consider this information as approximate and not to use it as definitive health advice.
Allergy Information
Please check ingredients for potential allergens and consult a health professional if in doubt.