Easy Chicken Potstickers – Crispy Pan Fried Dumplings
Chicken potstickers, those irresistible pan-fried dumplings, are a guaranteed crowd-pleaser and a personal favorite of mine. There’s just something magical about the contrast: a perfectly seared, crispy bottom giving way to a tender, steamed top, all encasing a savory, flavorful filling. The reason they’re so beloved is multifaceted. They offer a delightful textural journey with every bite, a satisfying chegrape juicess followed by a delicate yielding. But what truly elevates these chicken potstickers from just another appetizer to an iconic dish is the harmonious blend of ingredients within that delicate wrapper. Think succulent chicken, crisp vegetables, and aromatic seasonings – a symphony of flavors that dance on your palate. They’re incredibly versatile too, perfect as a starter, a light lunch, or even a delightful main course. Get ready to master the art of making these incredible chicken potstickers in your own kitchen!
Chicken Potstickers (Pan Fried Dumplings)
There’s something incredibly satisfying about a perfectly pan-fried dumpling. The crispy, golden-brown bottom giving way to a tender, chewy wrapper, all filled with a savory, juicy chicken mixture – it’s a flavor and texture sensation that’s hard to beat. Making potstickers at home might seem a little intimidating at first, but I promise you, it’s totally achievable and so rewarding. This recipe for Chicken Potstickers uses readily available ingredients and breaks down the process into manageable steps. Get ready to impress yourself and anyone lucky enough to share these with you!
Ingredients:
Preparing the Potsticker Filling
The heart of any great dumpling is its filling. We’ll start by preparing our flavorful chicken mixture. In a medium-sized bowl, combine the 1 lb of ground chicken. To this, add the finely chopped napa cabbage, which will add a lovely freshness and moisture to the filling. Sprinkle in 1 tsp of salt. This is crucial for drawing out some of the moisture from the cabbage and seasoning the chicken. Next, add the 4 sliced green onions, ensuring they are evenly distributed. The aromatic backbone of our filling comes from the 6 minced garlic cloves and the 2-inch piece of minced gin extractger. These aromatics are key to that authentic potsticker flavor.
Now, let’s bring it all together with our savory sauces and seasonings. Add 1 tbsp of soy sauce for that classic umami depth. Follow this with 1 tbsp of oyster sauce, which adds a wonderful richness and slightly sweet, savory note. A tablespoon of sesame oil will infuse the filling with its characteristic nutty aroma. For an extra boost of chicken flavor, we’ll add 1 tbsp of chicken bouillon. Finally, season with 1 tsp of white pepper for a gentle warmth.
Once all the ingredients are in the bowl, it’s time to mix. I like to use my hands for this, as it allows me to really combine everything thoroughly and evenly. Gently but firmly mix the ingredients until they are well incorporated. Be careful not to overmix, as this can make the chicken tough. You want everything to be evenly distributed so that each bite of your potsticker is packed with flavor.
Assembling the Potstickers
Now comes the fun part: assembling the dumplings! You’ll need your 1 lb of circular dumpling wrappers. It’s a good idea to keep the wrappers covered with a damp paper towel or a plastic wrap as you work, so they don’t dry out.
To assemble a potsticker, take one wrapper and place it in the palm of your hand. Spoon about 1 to 1.5 tablespoons of the chicken filling into the center of the wrapper. Don’t overfill, or it will be difficult to seal.
There are many ways to pleat a potsticker, but a simple and effective method is as follows: Moisten the edge of half of the wrapper with a little water using your finger. Bring the other half of the wrapper over the filling to create a half-moon shape. Starting from one end, create small pleats along one side of the wrapper, pressing the pleats firmly against the flat edge of the other side to seal. This creates a beautiful, senon-alcoholic aled edge that will hold all that delicious filling inside. Continue pleating until you reach the other end. Ensure the seal is tight to prevent any filling from escaping during cooking. Place the finished potsticker on a lightly floured surface or parchment paper, making sure they don’t touch each other, to prevent sticking. Repeat this process until all your filling and wrappers are used.
Pan-Frying to Golden Perfection
This is where the “potsticker” magic happens! We’re going to achieve that signature crispy bottom with a tender steamed top.
Heat about 1 to 2 tablespoons of neutral cooking oil (like vegetable or canola oil) in a large non-stick skillet or a cast-iron pan over medium-high heat. Once the oil is shimmering, carefully arrange a single layer of your assembled potstickers in the pan, flat-side down. You’ll want to leave some space between them, so don’t overcrowd the pan; you may need to cook them in batches.
Let the potstickers cook undisturbed for about 2-3 minutes, or until the bottoms are beautifully golden brown and crispy. This is the crucial step for that irresistible crunch.
Next, carefully add about ½ cup of water to the hot skillet. Be cautious as the water will steam up immediately. Cover the skillet tightly with a lid. Reduce the heat to medium-low and let the potstickers steam for about 5-7 minutes, or until the chicken filling is fully cooked through and the wrappers are tender and translucent. The water will evaporate, leaving behind a slightly sticky residue that contributes to the crispiness.
Once the water has evaporated and the potstickers are cooked through, remove the lid and increase the heat slightly to medium. Cook for another 1-2 minutes, allowing any remaining moisture to evaporate and ensuring the bottoms stay crispy. This final step helps to re-crisp the bottoms after steaming.
Serving Your Delicious Potstickers
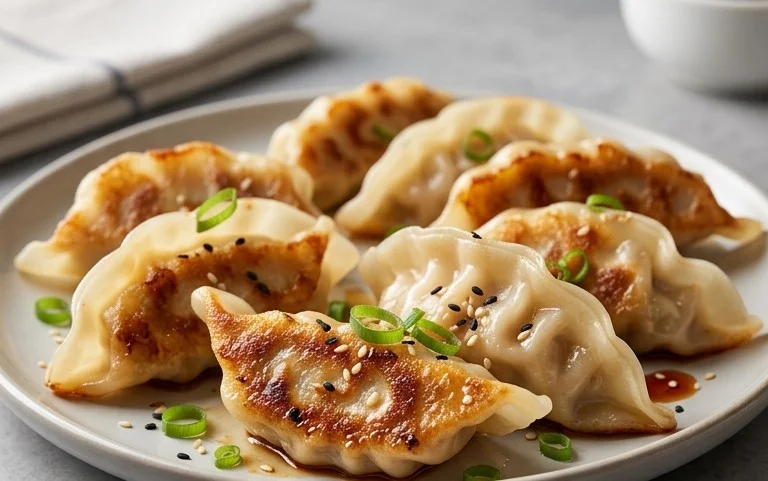
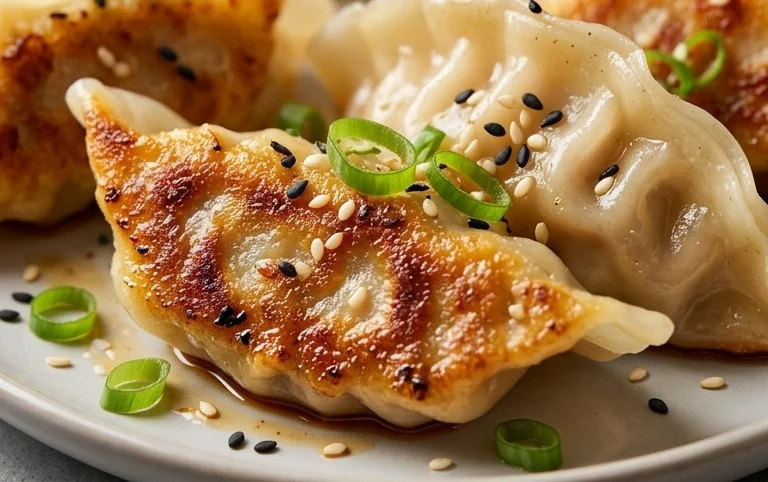
Carefully remove the golden-brown potstickers from the pan. Arrange them on a serving platter. Garnish with some fresh, thinly sliced green onions and a sprinkle of sesame seeds for extra flavor and visual appeal. Serve them immediately with your favorite dumpling dipping sauce. A classic dipping sauce often consists of soy sauce, rice vinegar, and a dash of chili oil or a little grated gin extractger, but store-bought options are also fantastic. Enjoy the crispy, savory goodness you’ve created!
Conclusion:
There you have it – a foolproof guide to making incredibly delicious chicken potstickers (pan fried dumplings) right in your own kitchen! This recipe truly shines because it balances ease of preparation with that satisfying crispy bottom and juicy, flavorful filling that defines perfect potstickers. The combination of tender chicken, crisp vegetables, and savory seasonings encased in a delicate wrapper is simply irresistible. Whether you’re looking for an impressive appetizer for a dinner party or a comforting weeknight meal, these pan-fried dumplings are a winner. They pair beautifully with a variety of dipping sauces, from classic soy-gin extractger to a spicy chili oil. Don’t be afraid to get creative with your fillings too – think about adding finely chopped shiitake mushrooms for an earthy depth, or perhaps some water chestnuts for an extra crunch. I truly encourage you to give this recipe a try; the reward of homemade dumplings is so worth it!
Frequently Asked Questions:
Can I make the filling ahead of time?
Absolutely! You can prepare the chicken filling up to 24 hours in advance and store it in an airtight container in the refrigerator. This makes assembly on cooking day much quicker!
What are the best dipping sauces for chicken potstickers?
Classic choices include a simple mixture of soy sauce, rice vinegar, and sesame oil. For a bit of heat, add some chili garlic sauce or a drizzle of chili oil. A sweet and sour sauce or a creamy peanut sauce can also be delightful variations.
My potstickers aren’t getting crispy. What am I doing wrong?
Ensure your pan is hot enough before adding the dumplings and that you’re using enough oil. Also, don’t overcrowd the pan; cook them in batches if necessary. The key to that perfect crisp is a good sear!
Chicken Potstickers (Pan Fried Dumplings)
Delicious homemade chicken potstickers, pan-fried to a perfect crisp and tender inside.
Ingredients
-
1 lb ground chicken
-
1 lb circular dumpling wrapper
-
2 cups napa cabbage (chopped)
-
1 tsp salt
-
4 green onions (sliced)
-
6 garlic cloves (minced)
-
2 inch ginger (minced)
-
1 tbsp soy sauce
-
1 tbsp oyster sauce
-
1 tbsp sesame oil
-
1 tbsp chicken bouillon
-
1 tsp white pepper
-
dumpling dipping sauce
-
green onions
-
sesame seeds
Instructions
-
Step 1
In a large bowl, combine ground chicken, chopped napa cabbage, sliced green onions, minced garlic, minced ginger, soy sauce, oyster sauce, sesame oil, chicken bouillon, and white pepper. Mix thoroughly until well combined. -
Step 2
Place about 1 tablespoon of the chicken mixture onto the center of each dumpling wrapper. Moisten the edges of the wrapper with water and fold in half, pressing to seal. You can create pleats along the edge for a decorative finish. -
Step 3
Heat 1-2 tablespoons of oil in a non-stick skillet over medium-high heat. Arrange the potstickers in a single layer, ensuring they don’t touch. -
Step 4
Cook for 2-3 minutes until the bottoms are golden brown and crispy. -
Step 5
Carefully add about 1/4 cup of water to the skillet (it will steam), then immediately cover with a lid. Reduce heat to medium-low and steam for 5-7 minutes, or until the chicken is cooked through and the wrappers are tender. -
Step 6
Remove the lid and let any remaining water evaporate. Serve hot with dumpling dipping sauce, garnished with sliced green onions and sesame seeds.
Important Information
Nutrition Facts (Per Serving)
It is important to consider this information as approximate and not to use it as definitive health advice.
Allergy Information
Please check ingredients for potential allergens and consult a health professional if in doubt.