Cherry Pie Bombs- irresistible- easy- sweet treat
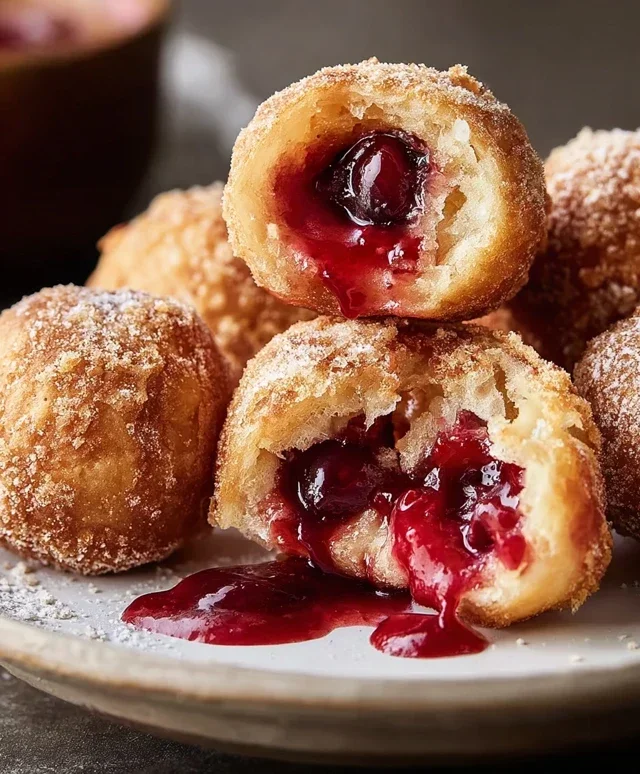
Cherry Pie Bombs are the ultimate sweet surprise, guaranteed to explode with flavor and bring smiles to any gathering. Who can resist the allure of warm, gooey cherry filling encased in a perfectly flaky, golden crust? I know I can’t! These delightful little morsels capture all the comforting nostalgia of a classic cherry pie, but in a portable, bite-sized package that’s incredibly fun to eat. What makes Cherry Pie Bombs truly special is their delightful contrast: the slight tartness of the cherries bursting against the sweet, buttery pastry. They’re the perfect treat for parties, potlucks, or just a special indulgence when you crave something utterly delicious. Get ready to fall in love with these irresistible Cherry Pie Bombs!
Cherry Pie Bombs
Get ready to experience pure dessert bliss with these delightful Cherry Pie Bombs! These little flavor explosions are incredibly easy to make, perfect for satisfying a sweet craving, impressing guests, or just treating yourself to something truly special. Imagin extracte the warm, gooey, cherry-filled center encased in a golden-brown, slightly crispy exterior, all finished off with a sweet, luscious glaze. That’s what awaits you with every bite of these irresistible treats. They’re like mini cherry pies, but even better because they’re handheld and utterly addictive. Whether you’re a seasoned baker or just starting out in the kitchen, these Cherry Pie Bombs are a guaranteed win. Let’s dive into what you’ll need to create this magical dessert.
Ingredients:
Making the Magic Happen: Step-by-Step
Here’s how we’ll transform these simple ingredients into something truly extraordinary. Follow these steps carefully, and you’ll be enjoying your homemade Cherry Pie Bombs in no time!
Prepare Your Workspace and Biscuits: First things first, let’s get our assembly line ready. You’ll want to have a clean, flat surface to work on. Open up your can of Grands “Big” biscuits. Gently unroll them and separate them. Now, here’s a crucial step for creating that perfect pocket for our cherry filling: flatten each biscuit slightly. You can do this with your hands or a rolling pin, aiming for a roughly circular shape. Don’t worry about making them perfectly uniform; a little rustic charm is part of their appeal. The key is to create a surface large enough to hold a generous spoonful of cherry pie filling without it spilling out when we seal them up.
Now, let’s talk about the cherry filling. Open your can of cherry pie filling. You can give it a gentle stir to ensure the cherries and the syrupy goodness are well combined. We want every bite to have that fantastic cherry flavor.
Stuffing the Bombs: This is where the fun really begin extracts! Take one flattened biscuit and place about one to two tablespoons of cherry pie filling in the center. Be generous, but don’t overstuff, or it will be difficult to seal. Now, take another flattened biscuit and place it directly on top of the biscuit with the filling. Gently press the edges together to seal the two biscuits around the cherry filling. You can use your fingers to crimp the edges, much like you would with a traditional pie crust, to ensure a good seal. This is important to prevent the filling from leaking out during the frying process. If you find it a bit tricky to seal, a fork can be your best friend here; press the tines of the fork around the edges to create a more secure seal. Repeat this process with all your biscuits and cherry filling, creating little cherry-filled pockets.
Frying to Golden Perfection: Now it’s time to get these bombs looking beautiful and tasting delicious. You’ll need a deep pot or Dutch oven for frying. Pour enough vegetable oil into the pot so that your biscuit bombs can be fully submerged. Heat the oil over medium-high heat. You’ll know the oil is ready when you drop a tiny piece of biscuit dough into it, and it sizzles and floats to the surface. This usually takes about 350-375 degrees Fahrenheit. Carefully, and I mean carefully, using tongs or a slotted spoon, place a few of your stuffed biscuit bombs into the hot oil. Don’t overcrowd the pot, as this can lower the oil temperature and lead to greasy bombs. You want to give them enough space to fry evenly. Fry them for about 2-3 minutes per side, or until they are a beautiful golden brown. Keep an eye on them, as they can go from perfectly golden to too dark very quickly.
Draining and Cooling: Once your Cherry Pie Bombs have achieved that glorious golden hue, carefully remove them from the hot oil using your slotted spoon or tongs. Place them on a plate lined with paper towels. This step is crucial for absorbing any excess oil, ensuring that your bombs are crispy and not greasy. Let them cool on the paper towels for a few minutes. While they’re still warm, they are incredibly tempting, but allowing them to cool slightly will make them easier to handle and glaze. This brief cooling period also allows the internal cherry filling to settle a little, so you don’t get a molten lava situation when you take your first bite.
Whipping Up the Glaze and Finishing Touches: While your bombs are cooling, let’s make the quick and easy glaze that will take them over the top. In a medium bowl, whisk together the powdered sugar, milk, and light corn syrup. Start with the ¼ cup of milk and add more, a teaspoon at a time, if needed, until you reach your desired consistency. You’re looking for a thick but pourable glaze. If it’s too thin, add more powdered sugar. If it’s too thick, add a tiny bit more milk. Drizzle this luscious glaze generously over the still-warm Cherry Pie Bombs. The warmth of the bombs will help the glaze set beautifully. You can use a spoon to drizzle it artfully, or for a more uniform coating, you can dip the tops of the bombs into the glaze. Serve them immediately for the best experience, or store any leftovers in an airtight container at room temperature. They are truly delightful served warm, but still tasty at room temperature. Enjoy every single bite of your homemade Cherry Pie Bombs!
Conclusion:
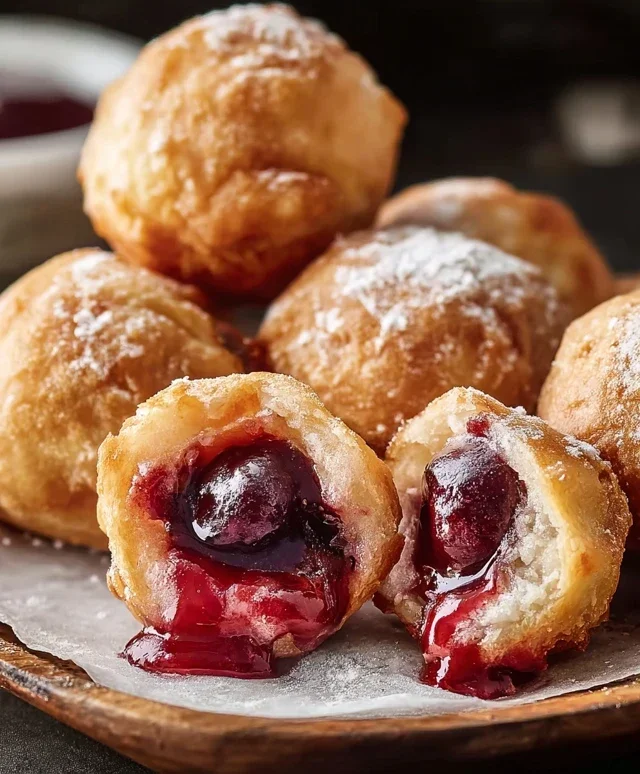
So there you have it! My absolute favorite Cherry Pie Bombs recipe is more than just a dessert; it’s an explosion of sweet and tart cherry goodness encased in a perfectly flaky, golden pastry. These little bites are incredibly versatile and are guaranteed to be a showstopper at any gathering, or simply a delightful treat for yourself. Their compact size makes them incredibly easy to handle, and the irresistible combination of warm, gooey cherry filling with that buttery crust is simply divine. I truly encourage you to give these Cherry Pie Bombs a try – they are surprisingly simple to make and the results are so rewarding!
Serving these little treasures warm, perhaps with a dollop of whipped cream or a scoop of vanilla bean ice cream, is pure bliss. They’re also fantastic at room temperature, making them perfect for potlucks or picnics. Don’t be afraid to get creative with variations! Consider adding a hint of almond extract to the filling for a marznon-alcoholic ipan-like flavor, or sprinkle a little cinnamon and sugar on top before baking for an extra layer of warmth and crunch. You could even try a mixed berry version if cherries aren’t your preference.
Frequently Asked Questions:
Q: Can I make Cherry Pie Bombs ahead of time?
Yes, you absolutely can! You can assemble the Cherry Pie Bombs and store them unbaked in the refrigerator for up to 24 hours. For longer storage, freeze them on a baking sheet until solid, then transfer to a freezer-safe container. Bake them directly from frozen, adding a few extra minutes to the baking time.
Q: What if I don’t have fresh cherries? Can I use frozen or canned?
Definitely! Frozen cherries work wonderfully. Thaw them first and drain any excess liquid. Canned pitted cherries (in heavy syrup or water) can also be used, but be sure to drain them very well and consider reducing the added sugar in the recipe slightly, as canned cherries are often sweeter.
Cherry Pie Bombs
Deliciously sweet and fried biscuit bites filled with cherry pie filling, then drizzled with a sweet glaze.
Ingredients
-
16.3 ounces Grands “Big” biscuits, flaky
-
21 ounces cherry pie filling
-
Vegetable oil, for frying
-
2 cups powdered sugar
-
¼ cup milk
-
1 tablespoon light corn syrup
Instructions
-
Step 1
Open the Grands biscuits and separate them. Flatten each biscuit slightly with your hands. -
Step 2
Spoon about 1-2 tablespoons of cherry pie filling into the center of each flattened biscuit. Carefully fold the edges of the biscuit over the filling and pinch to seal, forming a ball or “bomb” shape. Ensure there are no gaps for the filling to leak out during frying. -
Step 3
Heat vegetable oil in a deep skillet or Dutch oven to about 350°F (175°C). Carefully add the cherry pie bombs, ensuring not to overcrowd the pan. Fry in batches for about 2-3 minutes per side, or until golden brown and puffed. -
Step 4
Remove the fried cherry pie bombs with a slotted spoon and place them on a plate lined with paper towels to drain excess oil. -
Step 5
While the bombs are cooling slightly, prepare the glaze by whisking together powdered sugar, milk, and light corn syrup in a small bowl until smooth and pourable. -
Step 6
Drizzle the glaze generously over the warm cherry pie bombs. Serve immediately.
Important Information
Nutrition Facts (Per Serving)
It is important to consider this information as approximate and not to use it as definitive health advice.
Allergy Information
Please check ingredients for potential allergens and consult a health professional if in doubt.