Campfire Grilled Nachos- Easy Outdoor Cheesy Treat
Campfire grilled nachos are more than just a meal; they’re an experience. Imagin extracte this: the crackling fire, the scent of woodsmoke mingling with melting cheese, and the sheer joy of scooping up a perfectly crisp, loaded tortilla chip. There’s something undeniably magical about gathering around a campfire, and transforming humble ingredients into something so incredibly delicious just elevates the whole adventure. We all love nachos, but there’s a rustic charm and a smoky, caramelized flavor that only campfire grilled nachos can deliver. Forget boring ovens and mundane microwaves; this recipe brings the heat and the fun directly to your campsite. It’s the ultimate communal dish, perfect for sharing with friends and family after a day of exploring. Get ready to elevate your outdoor cooking game with this simple yet spectacular take on a crowd-pleasing favorite.
Campfire Grilled Nachos
There’s something undeniably magical about cooking over an open flame, the smoky aroma mingling with the anticnon-alcoholic ipation of a delicious meal. And when it comes to campfire cooking, few things are as satisfying and crowd-pleasing as a bubbling, cheesy plate of grilled nachos. Forget flimsy foil packets and uneven heat; with a few simple tricks, you can create a nacho masterpiece that will have everyone reaching for more. These campfire grilled nachos are the perfect way to end a day of hiking, stargazing, or just enjoying the great outdoors. They’re adaptable, customizable, and best of all, incredibly fun to make.
Ingredients:
Cooking Instructions:
Step 1: Prepare the Ground Meat Mixture
The first step is to get our savory meat base ready. Over the campfire, you’ll want to use a cast-iron skillet or a heavy-duty camping pan that can withstand direct heat. Add your ground meat to the preheated skillet and break it up with a spoon or spatula. Cook the meat until it’s browned all the way through, draining off any excess grease as it cooks. This is important to prevent the nachos from becoming too greasy. Once the meat is browned, stir in the taco seasoning. Add about 1/4 cup of water and let it simmer for a few minutes, allowing the seasoning to meld with the meat and create a flavorful, cohesive mixture. If you’re using refried beans, you can add them to the skillet with the seasoned meat and stir until heated through. If you’re using whole beans, drain and rinse them well, and you can add them directly to the nachos later.
Step 2: Assemble Your Nacho Base
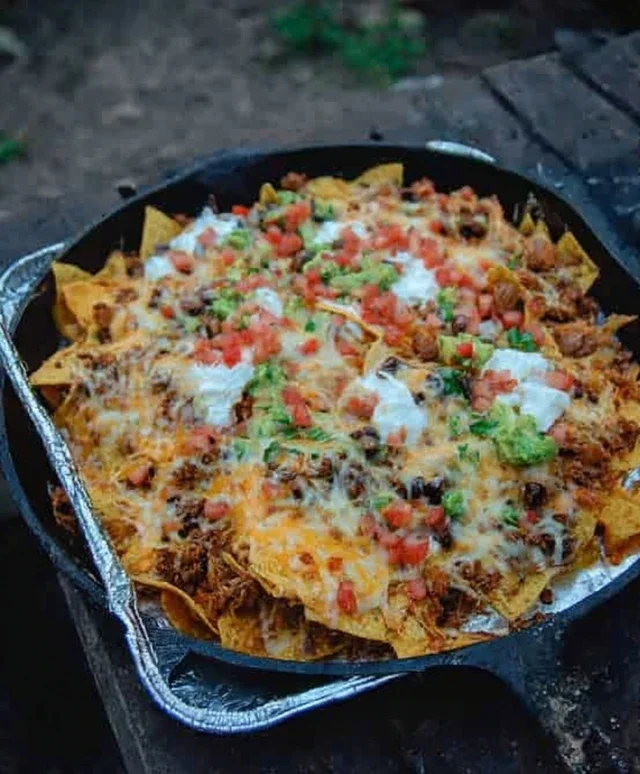
Now for the fun part – building your nacho layers! You’ll need a sturdy, heat-resistant vessel for this. A large cast-iron skillet or a heavy-duty disposable aluminum pan (the kind often used for roasting meats) works perfectly. Spread a generous, even layer of tortilla chips across the bottom of your chosen pan. Don’t overcrowd the pan; you want to ensure all those delicious toppings get distributed. Once your first layer of chips is down, evenly distribute about half of your seasoned ground meat mixture over the chips. Then, scatter half of your drained and rinsed beans (if using whole beans) over the meat. This creates a fantastic foundation of flavor.
Step 3: Layer on the Cheese and Veggies
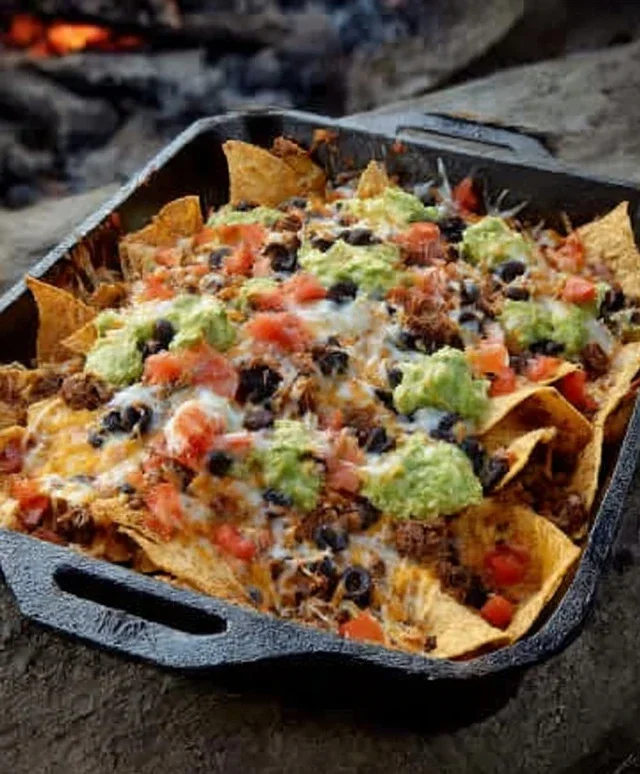
This is where the magic truly starts to happen. Sprinkle a generous portion of your shredded cheese over the meat and beans. You want enough cheese to create that gooey, melty deliciousness that defines great nachos. Next, scatter half of your diced tomatoes, chopped onion, and diced green chilis (or jalapeño) over the cheese. The heat from the fire will start to soften these ingredients and release their flavors. If you have a second large skillet or pan, you can start assembling another layer of nachos in it simultaneously to maximize your grilling space and speed. If not, don’t worry, we’ll get it all done!
Step 4: Repeat and Prepare for Grilling
Now, we repeat the layering process to create a truly epic nacho experience. Add another layer of tortilla chips on top of the first layer of toppings. Carefully spread the remaining ground meat mixture and beans over these chips. Finish by topping generously with the rest of your shredded cheese, diced tomatoes, chopped onion, and green chilis. Aim for an even distribution so every bite is packed with flavor. It’s crucial to make sure your pan is stable and can be easily moved to and from the campfire’s heat.
Step 5: The Campfire Grill
This is the crucial stage where we transform our assembled nachos into a bubbling, molten masterpiece. You want to place your nacho pan on a grill grate over a medium-hot campfire. The key here is indirect heat. You don’t want the flames licking the bottom of your pan, as this will scorch the chips. If your campfire is very hot, you might need to create a barrier, like placing a layer of foil or a flat rock between the fire and your nacho pan. Cover the pan with a lid or heavy-duty aluminum foil to trap the heat and help the cheese melt evenly and the ingredients heat through. Let the nachos grill for about 10-15 minutes, or until the cheese is fully melted and bubbly, and the ingredients are heated through. Keep a close eye on them, as campfire cooking can be unpredictable. You might need to rotate the pan occasionally for even cooking.
Step 6: The Finishing Touches and Serving
Once your campfire grilled nachos are perfectly melted and gooey, carefully remove the pan from the campfire using sturdy oven mitts or campfire gloves. Let them cool for just a minute or two – you don’t want to burn yourself, but you also don’t want them to cool down too much before serving. Now it’s time for the fresh toppings! Sprinkle your diced avocado over the hot nachos. The heat will slightly warm the avocado, making it wonderfully creamy. Add any other desired toppings like a dollop of sour cream, a spoonful of salsa, fresh cilantro, or some pickled jalapeños for an extra kick. A squeeze of fresh lime juice is also a fantastic addition that brightens all the flavors. Serve immediately directly from the pan, encouragin extractg everyone to dig in and enjoy the fruits (and cheese!) of your campfire labor. These are best enjoyed communal-style, straight from the pan, with plenty of napkins!
Conclusion:
And there you have it – the ultimate guide to crafting incredible Campfire Grilled Nachos! This recipe is a true winner because it’s not just about delicious, gooey cheese and crispy chips; it’s about the experience. The smoky infusion from the campfire adds an unparalleled depth of flavor that you simply can’t achieve in a regular kitchen. Imagin extracte the crackling fire, the crisp night air, and the shared joy of diggin extractg into a warm, satisfying plate of nachos with your favorite people. It’s the perfect campfire treat, easy to assemble and even easier to devour.
Serve these beauties as a hearty appetizer around the fire, a delightful main course for a casual outdoor meal, or even a late-night snack under the stars. For variations, consider adding pulled beef, seasoned ground beef, black beans, or even some spicy jalapeños for an extra kick. Don’t be afraid to experiment with different cheeses too – pepper jack or a Monterey Jack blend are fantastic options. I truly hope you give these Campfire Grilled Nachos a try on your next outdoor adventure. They’re guaranteed to be a hit!
Frequently Asked Questions:
What’s the best kind of pan to use for campfire nachos?
A sturdy cast-iron skillet is your best friend here. It distributes heat evenly and can withstand the direct heat of the campfire. Just be sure to use a good quality oven mitt or heat-resistant gloves when handling it!
Can I make these ahead of time?
You can prep most of your ingredients ahead of time, like chopping veggies and opening cans. However, it’s best to assemble the nachos right before grilling to prevent the chips from getting soggy. The cheese melts beautifully when cooked fresh!
How do I prevent my chips from burning?
Keep an eye on the heat and the chips. You want a steady, moderate heat. If it feels too hot, lift the skillet off the direct flames for a moment. Covering the skillet loosely with foil can also help the cheese melt without burning the chips too quickly.
Campfire Grilled Nachos
Easy and delicious campfire grilled nachos, perfect for outdoor adventures.
Ingredients
-
tortilla chips
-
ground pork
-
taco seasoning
-
black beans
-
shredded cheddar cheese
-
diced tomatoes
-
diced red onion
-
diced jalapeños
-
avocado, sliced
Instructions
-
Step 1
In a skillet over the campfire, brown the ground pork with taco seasoning according to package directions. Drain any excess grease. -
Step 2
Arrange half of the tortilla chips in a single layer on a sturdy, grill-safe platter or a piece of heavy-duty aluminum foil. -
Step 3
Spread half of the cooked ground pork and half of the black beans over the chips. -
Step 4
Top with half of the shredded cheddar cheese, diced tomatoes, diced red onion, and diced jalapeños. -
Step 5
Repeat the layers with the remaining chips, pork, beans, cheese, tomatoes, onion, and jalapeños. -
Step 6
Carefully place the platter or foil packet onto the grill grate over medium heat. Cover with a lid or more foil, if possible. -
Step 7
Grill for 5-10 minutes, or until the cheese is melted and bubbly. -
Step 8
Remove from the grill and top with sliced avocado before serving.
Important Information
Nutrition Facts (Per Serving)
It is important to consider this information as approximate and not to use it as definitive health advice.
Allergy Information
Please check ingredients for potential allergens and consult a health professional if in doubt.