Crispy Chicken Caesar Sandwich- Easy & Delicious Recipe
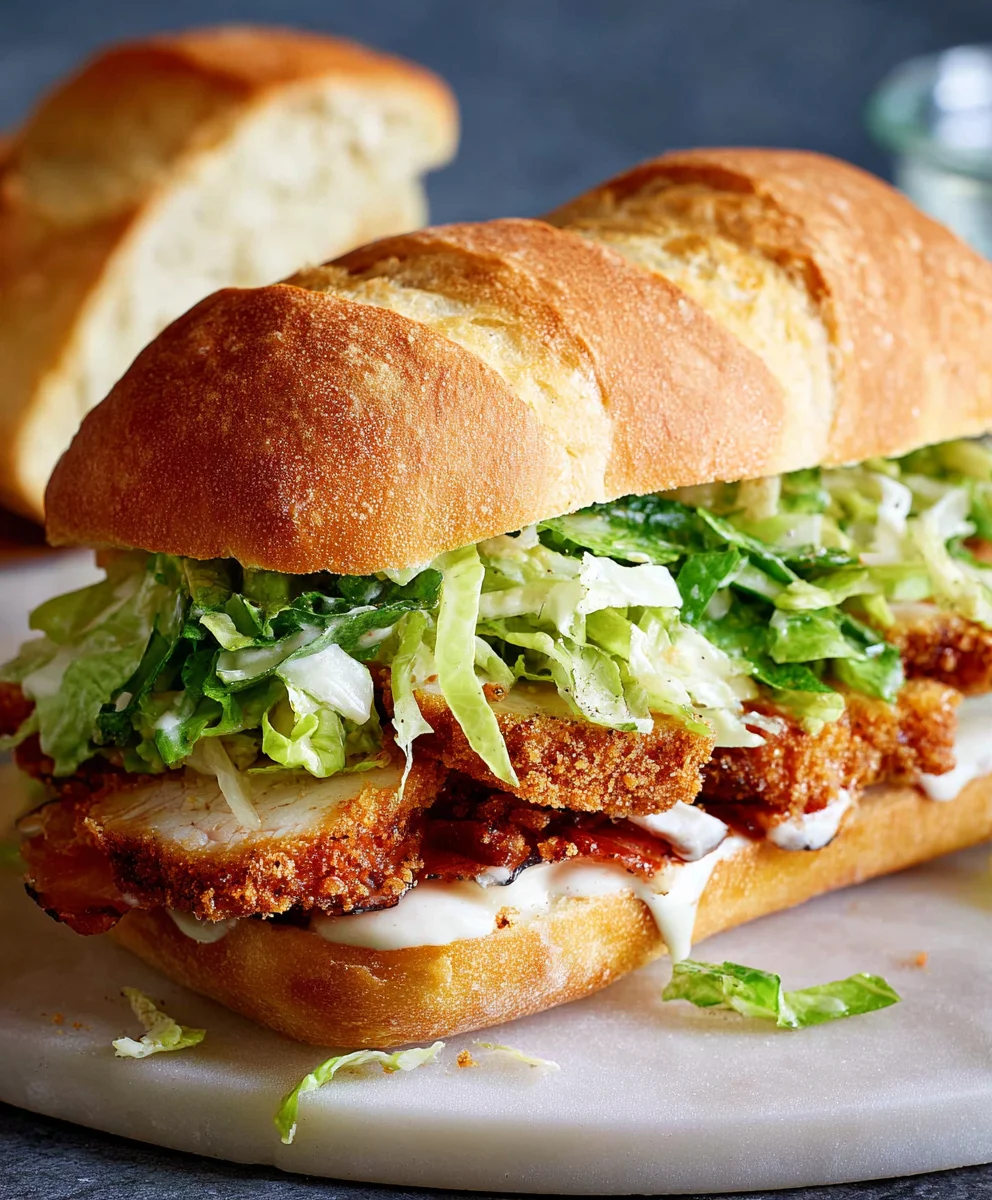
Crispy Chicken Caesar Sandwich: it’s more than just a meal; it’s an experience that ignites the senses and satisfies those deep-seated cravings for something both comforting and exciting. What is it about this iconic combination that makes it a universally adored choice? Perhaps it’s the delightful textural contrast – the satisfying crunch of perfectly fried chicken against the pillowy softness of the bread. Or maybe it’s the symphony of flavors: the tangy Caesar dressing, the savory chicken, and the sharp bite of Parmesan cheese. This isn’t your average sandwich; the Crispy Chicken Caesar Sandwich elevates the classic salad into a handheld masterpiece, perfect for a quick lunch, a delightful dinner, or even a sophisticated picnic. We’re about to unlock the secrets to creating the ultimate Crispy Chicken Caesar Sandwich right in your own kitchen, transforming simple ingredients into pure culinary magic.
Ingredients:
- ½ cup full-fat mayonnaise
- 3 tbsp Greek yogurt
- 1 tsp Dijon mustard
- 1 tsp Worcestershire sauce
- 2 tbsp fresh lemon juice
- ¼ cup freshly grated Parmesan cheese
- 1-2 garlic cloves, minced
- ¼ tsp black pepper
- Pinch of sea salt
- 5 chicken cutlets (boneless, skinless chicken breast cut into thinner pieces, about ½-inch thick)
- Sea salt, to taste
- Ground black pepper, to taste
- Oil, for frying (vegetable oil, canola oil, or peanut oil work well)
- ⅓ cup all-purpose flour
- ½ tsp salt (for the flour dredge)
- 4 large romaine lettuce leaves, washed and dried
- 4 slices of your favorite bread (sourdough or brioche are excellent choices)
- Optional: Extra Parmesan cheese for topping
Preparing the Caesar Dressing
Step 1: Whisk the Wet Ingredients
In a medium bowl, combine the full-fat mayonnaise, Greek yogurt, Dijon mustard, and Worcestershire sauce. Whisk these ingredients together until they are thoroughly blended and smooth. The Greek yogurt helps to lighten the dressing and add a slight tang, while the Dijon and Worcestershire provide depth of flavor.
Step 2: Incorporate Aromatics and Seasoning
Add the fresh lemon juice, minced garlic cloves, ¼ teaspoon of black pepper, and a pinch of sea salt to the bowl with the mayonnaise mixture. Continue whisking until all the ingredients are well incorporated. Taste the dressing at this point and adjust the seasoning if necessary. You might want a little more lemon for brightness, or more pepper for a kick. Remember, this dressing will coat the chicken and lettuce, so a well-balanced flavor is key.
Step 3: Stir in the Parmesan Cheese
Gently fold in the ¼ cup of freshly grated Parmesan cheese into the Caesar dressing. Stir until it’s just combined. Avoid overmixing at this stage; you want to maintain some of the cheesy texture. Set this delicious Caesar dressing aside to allow the flavors to meld while you prepare the chicken.
Cooking the Crispy Chicken Cutlets
Step 4: Prepare the Flour Dredge
In a shallow dish or a pie plate, combine the ⅓ cup of all-purpose flour with ½ teaspoon of salt. Mix these together thoroughly. This flour mixture will act as our crispy coating for the chicken. Ensure the salt is evenly distributed throughout the flour.
Step 5: Season and Dredge the Chicken
Pat your chicken cutlets dry with paper towels. This is a crucial step for achieving a truly crispy coating. Season both sides of each chicken cutlet generously with sea salt and ground black pepper to taste. Now, take each seasoned cutlet and press it firmly into the flour mixture, coating both sides evenly. Shake off any excess flour. You want a thin, even layer of flour, not a thick clump.
Step 6: Fry the Chicken
Heat about ½ inch of oil in a large skillet or frying pan over medium-high heat. You’ll know the oil is ready when a tiny piece of flour dropped into it sizzles immediately. Carefully place the floured chicken cutlets into the hot oil, ensuring not to overcrowd the pan. Cook the chicken for about 3-4 minutes per side, or until it’s golden brown and cooked through. The internal temperature should reach 165°F (74°C). Use tongs to turn the chicken and avoid piercing it with a fork, which can release valuable juices. Once cooked, remove the chicken from the skillet and place it on a wire rack set over a baking sheet to drain any excess oil and maintain crispness. This helps prevent the bottom from becoming soggy.
Assembling the Crispy Chicken Caesar Sandwich
Step 7: Toast the Bread
Lightly toast your bread slices until they are golden brown and firm enough to hold the sandwich fillings. You can do this in a toaster, under the broiler, or in the same skillet used for the chicken after wiping it clean.
Step 8: Dress the Lettuce
In a small bowl, gently toss the washed and dried romaine lettuce leaves with a few tablespoons of the prepared Caesar dressing. You want the lettuce to be lightly coated, not swimming in dressing. This ensures the leaves stay crisp and flavorful.
Step 9: Build Your Sandwich
Spread a generous amount of the remaining Caesar dressing on the inside of each toasted bread slice. Place a portion of the dressed romaine lettuce on the bottom slice of bread. Top the lettuce with a crispy fried chicken cutlet. If desired, you can add a sprinkle of extra grated Parmesan cheese over the chicken. Place the top slice of bread, dressing-side down, onto the fillings. Press down gently to compact the sandwich. Repeat for all four sandwiches. Enjoy immediately for the best crispy experience.

Conclusion:
There you have it – the ultimate guide to crafting the perfect Crispy Chicken Caesar Sandwich! We’ve walked through every step, from achieving that irresistible crunch on your chicken to assembling the layers of flavor that make this sandwich a true winner. This isn’t just a sandwich; it’s a symphony of textures and tastes that will leave you incredibly satisfied. Serve your Crispy Chicken Caesar Sandwich hot off the griddle for the ultimate experience, perhaps with a side of sweet potato fries or a light, refreshing coleslaw. Don’t be afraid to get creative with your own twists! Try adding some pickled red onions for a tangy bite, or a sprinkle of crushed red pepper flakes if you like a little heat. This recipe is your foundation, and you can build upon it to make it uniquely yours. We encourage you to give this Crispy Chicken Caesar Sandwich a try – we’re confident it will become a new favorite in your culinary repertoire!
Frequently Asked Questions:
Can I make the chicken ahead of time?
Absolutely! You can prepare the breaded chicken cutlets a day in advance and store them in the refrigerator. When you’re ready to assemble your Crispy Chicken Caesar Sandwich, simply reheat them in an oven or air fryer until they are hot and crispy again.
What kind of bread is best for this sandwich?
While a sturdy brioche bun or a ciabatta roll holds up well to the fillings, you can also experiment with other breads. A toasted sourdough or even a hearty whole wheat bread can offer a delightful contrast in texture and flavor to your Crispy Chicken Caesar Sandwich.
Crispy Chicken Caesar Sandwich
An easy and delicious recipe for a crispy chicken Caesar sandwich featuring homemade Caesar dressing and perfectly fried chicken cutlets.
Ingredients
-
½ cup full-fat mayonnaise
-
3 tbsp Greek yogurt
-
1 tsp Dijon mustard
-
1 tsp Worcestershire sauce
-
2 tbsp fresh lemon juice
-
¼ cup freshly grated Parmesan cheese
-
1-2 garlic cloves, minced
-
¼ tsp black pepper
-
Pinch of sea salt
-
5 chicken cutlets (boneless, skinless chicken breast cut into thinner pieces, about ½-inch thick)
-
Sea salt, to taste
-
Ground black pepper, to taste
-
Oil, for frying (vegetable oil, canola oil, or peanut oil work well)
-
⅓ cup all-purpose flour
-
½ tsp salt (for the flour dredge)
-
4 large romaine lettuce leaves, washed and dried
-
4 slices of your favorite bread (sourdough or brioche are excellent choices)
-
Optional: Extra Parmesan cheese for topping
Instructions
-
Step 1
Prepare the Caesar Dressing: In a medium bowl, combine the full-fat mayonnaise, Greek yogurt, Dijon mustard, and Worcestershire sauce. Whisk these ingredients together until they are thoroughly blended and smooth. -
Step 2
Incorporate Aromatics and Seasoning: Add the fresh lemon juice, minced garlic cloves, ¼ teaspoon of black pepper, and a pinch of sea salt to the bowl with the mayonnaise mixture. Continue whisking until all the ingredients are well incorporated. Taste and adjust seasoning. -
Step 3
Stir in the Parmesan Cheese: Gently fold in the ¼ cup of freshly grated Parmesan cheese into the Caesar dressing. Stir until it’s just combined. Set aside. -
Step 4
Prepare the Flour Dredge: In a shallow dish, combine the ⅓ cup of all-purpose flour with ½ teaspoon of salt. Mix thoroughly. -
Step 5
Season and Dredge the Chicken: Pat chicken cutlets dry. Season both sides generously with sea salt and ground black pepper. Press each cutlet firmly into the flour mixture, coating both sides evenly. Shake off excess flour. -
Step 6
Fry the Chicken: Heat about ½ inch of oil in a large skillet over medium-high heat. Carefully place floured chicken cutlets into the hot oil, without overcrowding. Cook for about 3-4 minutes per side until golden brown and cooked through (165°F/74°C). Drain on a wire rack. -
Step 7
Toast the Bread: Lightly toast your bread slices until golden brown and firm. -
Step 8
Dress the Lettuce: In a small bowl, gently toss the romaine lettuce leaves with a few tablespoons of the prepared Caesar dressing until lightly coated. -
Step 9
Build Your Sandwich: Spread Caesar dressing on the inside of each toasted bread slice. Layer dressed romaine lettuce on the bottom slice, top with a crispy chicken cutlet, and optional extra Parmesan cheese. Place the top slice of bread on top. Repeat for all sandwiches. Enjoy immediately.
Important Information
Nutrition Facts (Per Serving)
It is important to consider this information as approximate and not to use it as definitive health advice.
Allergy Information
Please check ingredients for potential allergens and consult a health professional if in doubt.