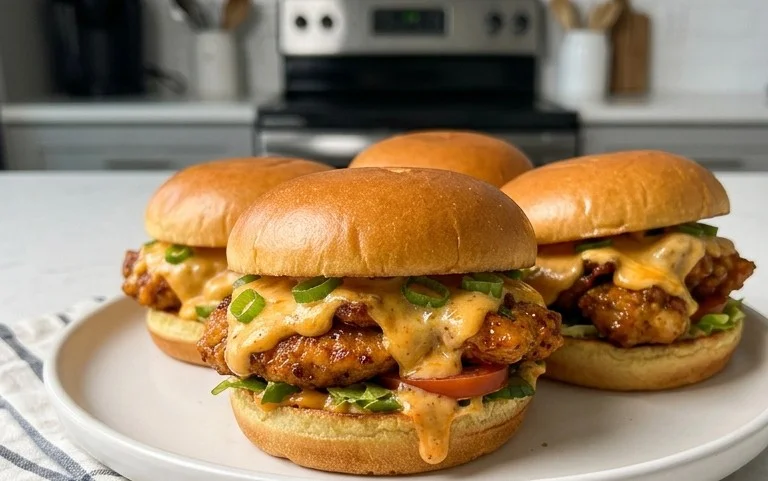
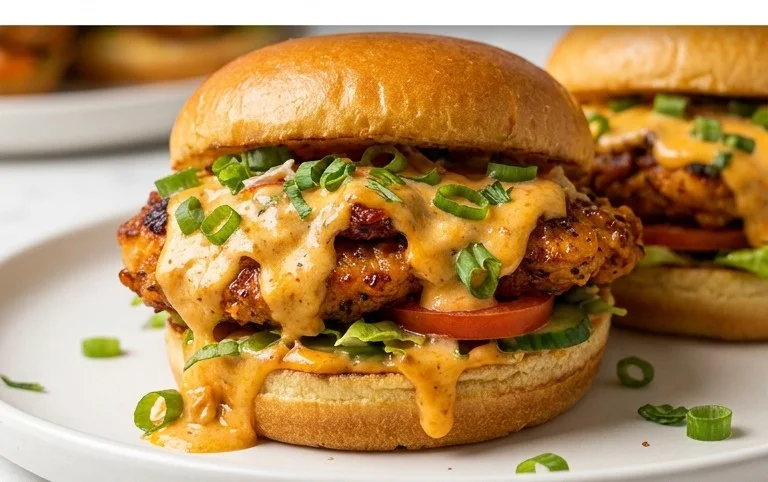
Cheesy Dynamite Chicken Buns-Spicy & Delicious Recipe
Cheesy Dynamite Chicken Buns are about to become your new obsession. Seriously, prepare yourselves for a flavor explosion that will have you reaching for seconds (and thirds!). We all have those comfort foods that just hit differently, and for so many of us, these Cheesy Dynamite Chicken Buns are at the top of that list. What is it about them? Is it the pillowy soft bun embracing tender, flavorful chicken? Or perhaps the irresistible, creamy, and spicy dynamite sauce that coats every bite? I suspect it’s a magical combination of all of the above, creating a dish that’s both satisfyingly indulgent and incredibly moreish. These aren’t just any chicken buns; they’re a culinary adventure waiting to happen in your own kitchen, a guaranteed crowd-pleaser for any occasion. Get ready to create a masterpiece!
Cheesy Dynamite Chicken Buns
Get ready to experience a flavor explosion with these Cheesy Dynamite Chicken Buns! These aren’t your average dinner rolls. We’re talking about soft, pillowy buns generously stuffed with a fiery, cheesy chicken filling that’s utterly irresistible. Perfect for a casual weeknight dinner, a fun party appetizer, or even a satisfying lunch, these buns are guaranteed to become a new favorite. The “dynamite” comes from a subtle kick of cayenne that perfectly complements the creamy cheese and tender chicken. Let’s get baking!
Ingredients:
Making the Dough: The Foundation of Fluffiness
The secret to incredibly soft and airy buns lies in a well-made dough. We’re starting by activating our yeast. In a large mixing bowl, combine the lukewarm water and milk. It’s crucial that the liquids are lukewarm – too hot and you’ll kill the yeast, too cold and it won’t activate properly. Think of it like a warm bath for your yeast! Stir in the honey, which acts as food for the yeast, and then sprinkle the instant yeast over the top. Give it a gentle whisk and let it sit for about 5-10 minutes. You should see a frothy layer form on the surface, indicating your yeast is alive and ready to work its magic.
Once your yeast is happily bubbling, add the room temperature egg and the sunflower oil to the bowl. The egg adds richness and helps bind the dough, while the oil contributes to its softness. Now, it’s time to add the dry ingredients. In a separate bowl, whisk together the flour, the 8g of salt, and the grated Parmesan cheese. The Parmesan cheese in the dough might sound unusual, but it adds a subtle savory depth that complements the filling beautifully. Gradually add the dry ingredients to the wet ingredients, mixing with a wooden spoon or a spatula until a shaggy dough forms.
Kneading and Rising: Developing the Gluten
Turn the dough out onto a lightly floured surface. Now comes the fun part: kneading! Knead the dough for about 8-10 minutes. This process develops the gluten, which is essential for the chewy texture and the ability of the buns to rise. You’re looking for a smooth, elastic dough that springs back when gently poked. If the dough is too sticky, add a little more flour, a tablespoon at a time. If it feels too dry, a tiny bit of water can help.
Once you’ve achieved that perfect dough consistency, add the softened butter. Continue kneading until the butter is fully incorporated and the dough is no longer greasy. It might feel a bit sticky at first, but keep kneading. Shape the dough into a ball and place it in a lightly oiled bowl, turning to coat. Cover the bowl tightly with plastic wrap or a clean kitchen towel and let it rise in a warm place for about 1 to 1.5 hours, or until it has doubled in size. A slightly warm oven (turned off!) is a great place for dough to rise.
Preparing the Dynamite Filling: The Flavor Core
While our dough is on its first rise, let’s get the star of the show ready: the dynamite chicken filling. In a bowl, combine the finely diced chicken filet with the 5g of salt, cayenne powder, onion powder, and black pepper powder. Mix everything thoroughly to ensure the chicken is evenly coated with the seasonings. The cayenne powder is where the “dynamite” comes in, providing a gentle heat that builds with each bite. Don’t worry if you’re sensitive to spice; you can always adjust the amount of cayenne to your preference. For a milder kick, start with less and add more if you dare!
Assembling the Buns: Stuffing the Goodness
Once the dough has doubled in size, gently punch it down to release the air. Turn the dough out onto a lightly floured surface and divide it into equal portions. The number of portions will depend on how large you want your buns to be; for a standard size, aim for about 10-12 pieces. Roll each portion into a smooth ball.
Now, for the assembly. Take one dough ball and flatten it into a disc. Place a generous spoonful of the seasoned chicken filling in the center. You want enough filling to be satisfying, but not so much that it’s difficult to seal. Carefully bring the edges of the dough up and around the filling, pinching them together to seal the bun completely. Make sure there are no gaps where the filling can escape during baking. Roll the senon-alcoholic aled bun between your palms to ensure it’s smooth and round. Place the senon-alcoholic aled buns on a baking sheet lined with parchment paper, leaving a little space between them as they will expand further.
The Second Rise and Baking: Golden Perfection
Cover the assembled buns loosely with a clean kitchen towel or plastic wrap and let them rise for a second time for about 30-45 minutes, or until they’ve puffed up significantly. This second rise is crucial for achieving that incredibly light and airy texture.
Preheat your oven to 190 degrees Celsius (375 degrees Fahrenheit). Before baking, you can brush the tops of the buns with a little milk or a whisked egg for a lovely golden-brown finish. Bake for 15-20 minutes, or until the buns are golden brown and sound hollow when tapped on the bottom. The aroma that will fill your kitchen is simply heavenly! Let the buns cool slightly on a wire rack before serving. These Cheesy Dynamite Chicken Buns are best enjoyed warm, where the cheese is melted and gooey, and the flavors are at their peak. Enjoy the delicious explosion of flavor!
Conclusion:
And there you have it – the incredibly delicious and satisfying Cheesy Dynamite Chicken Buns! This recipe is a true winner because it perfectly balances tender, flavorful chicken with a creamy, spicy dynamite sauce, all enveloped in soft, fluffy buns. It’s an explosion of taste and texture that’s guaranteed to be a hit with everyone, from picky eaters to adventurous foodies. Whether you’re looking for a show-stopping appetizer for your next gathering or a comforting weeknight meal, these buns deliver pure joy in every bite.
I highly encourage you to give these Cheesy Dynamite Chicken Buns a try. The process is straightforward, and the reward is immense. Don’t be afraid to experiment with the spice level to suit your preferences, and have fun with different serving ideas! They are fantastic on their own, but also wonderful served alongside a crisp green salad or some sweet potato fries.
Frequently Asked Questions:
Can I make the dynamite sauce spicier or milder?
Absolutely! To make the dynamite sauce spicier, you can increase the amount of Sriracha or add a pinch of cayenne pepper. For a milder version, reduce the Sriracha or omit it altogether and use a little less chili paste.
What other fillings can I use in these buns?
While chicken is fantastic, you could also try shredded beef, seasoned ground beef, or even a vegetarian option like seasoned tofu or jackfruit. Just ensure your filling is cooked and seasoned well before mixing with the dynamite sauce.
How should I store leftover Cheesy Dynamite Chicken Buns?
You can store any leftover buns in an airtight container in the refrigerator for up to 2-3 days. Reheat them gently in an oven or toaster oven for the best texture, though they can also be microwaved.
Cheesy Dynamite Chicken Buns
Spicy and cheesy chicken-stuffed buns with a hint of sweetness, perfect for a flavorful snack or meal.
Ingredients
-
75 ml water
-
200 ml milk
-
15 g honey
-
9 g instant yeast
-
1 egg
-
30 ml sunflower oil
-
600 g flour
-
8 g salt
-
25 g butter
-
40 g Parmesan cheese
-
2 g cayenne powder
-
1.5 g onion powder
-
1 g black pepper powder
-
700 g chicken filet, diced
-
5 g salt (for chicken)
Instructions
-
Step 1
In a large bowl, combine warm water (around 40°C), milk, honey, and yeast. Let it sit for 5-10 minutes until frothy. -
Step 2
Add the egg, sunflower oil, flour, and 8g salt to the yeast mixture. Mix until a dough forms, then knead on a floured surface for 8-10 minutes until smooth and elastic. Add softened butter and knead until incorporated. -
Step 3
Place the dough in a greased bowl, cover, and let it rise in a warm place for 1 hour, or until doubled in size. -
Step 4
While the dough rises, season the diced chicken filet with 5g salt, cayenne powder, onion powder, and black pepper powder. Sauté in a pan until cooked through. -
Step 5
Once the dough has risen, punch it down and divide it into 12 equal portions. Flatten each portion, add a portion of the cooked chicken and grated Parmesan cheese, then seal to form a bun. -
Step 6
Place the buns on a baking sheet lined with parchment paper. Cover and let them rest for another 15 minutes. -
Step 7
Preheat your oven to 180°C (350°F). Bake the buns for 18-20 minutes, or until golden brown and cooked through.
Important Information
Nutrition Facts (Per Serving)
It is important to consider this information as approximate and not to use it as definitive health advice.
Allergy Information
Please check ingredients for potential allergens and consult a health professional if in doubt.