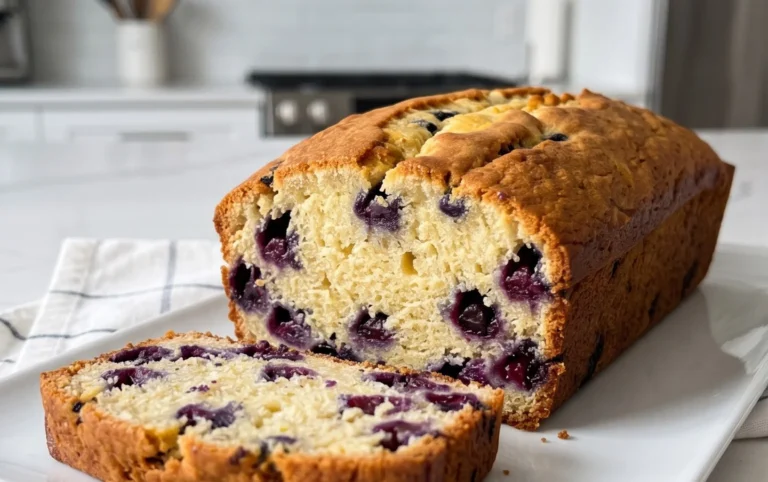
Zesty Lemon Loaf- The Ultimate Moist Cake Recipe
Lemon Loaf is more than just a sweet treat; it’s a ray of sunshine in baked form, a comforting hug on a plate, and a crowd-pleasing dessert that rarely fails to impress. There’s an undeniable magic to a perfectly baked lemon loaf – that delicate balance of zesty citrus and tender crum extractb, often crowned with a luscious, tangy glaze that melts in your mouth. What is it about this simple yet elegant cake that captures our hearts? Perhaps it’s the way the bright, invigorating flavor of lemon cuts through the richness, leaving you feeling refreshed and satisfied. Or maybe it’s the sheer versatility; it’s equally at home for a morning coffee break, an afternoon pick-me-up, or as a delightful ending to any meal. This particular recipe for Lemon Loaf takes all those beloved qualities and elevates them, offering a wonderfully moist texture and an explosion of authentic lemon flavor that will have everyone asking for seconds.

Ingredients:
- 1⅓ cup all-purpose flour
- 1¾ teaspoon baking powder
- ½ teaspoon salt
- ½ cup unsalted butter, softened to room temperature
- ⅔ cup granulated sugar
- 3 large eggs, at room temperature
- 1 cup sour cream, at room temperature
- 1½ tablespoons fresh lemon zest (this is approximately the zest from one medium-sized lemon)
- 2 tablespoons fresh lemon juice
- 1 tablespoon pure lemon extract
- 1 cup powdered sugar (also known as confectioners’ sugar)
- 1 tablespoon fresh lemon juice (for the glaze)
- 1 tablespoon milk (for the glaze)
- 1 tablespoon unsalted butter, melted (for the glaze)
Getting Started: Preparing Your Lemon Loaf
Preheating and Pan Preparation
Before you even think about mixing ingredients, preheat your oven to 350 degrees Fahrenheit (175 degrees Celsius). This ensures that your lemon loaf bakes evenly from the moment it enters the oven. Next, prepare your loaf pan. A standard 9×5 inch loaf pan is ideal for this recipe. Grease it thoroughly with butter or non-stick cooking spray, ensuring you get into all the corners. For an extra layer of insurance against sticking and to make removal a breeze, lightly dust the greased pan with flour, tapping out any excess. Alternatively, you can line your loaf pan with parchment paper, creating a sling that will allow you to lift the entire loaf out effortlessly once it’s baked.
Creating the Lemon Loaf Batter
Dry Ingredient Combination
In a medium-sized mixing bowl, whisk together the dry ingredients. This includes the 1⅓ cups of all-purpose flour, the 1¾ teaspoons of baking powder, and the ½ teaspoon of salt. Whisking them together ensures that the leavening agent (baking powder) and salt are evenly distributed throughout the flour. This is a crucial step for an evenly risen and well-seasoned loaf. Set this bowl aside.
Creaming Butter and Sugar
In a separate, larger mixing bowl, begin extract by creaming together the softened ½ cup of butter and the ⅔ cup of granulated sugar. Use an electric mixer (handheld or stand mixer with a paddle attachment) on medium speed. Creaming is the process of beating butter and sugar together until the mixture becomes light, fluffy, and pnon-alcoholic ale yellow. This process incorporates air into the batter, which contributes to the loaf’s tender texture. This typically takes about 3-5 minutes. Don’t rush this step; the aeration is key!
Incorporating Eggs and Wet Ingredients
Once the butter and sugar are well creamed, it’s time to add the eggs. Add the 3 large eggs one at a time, beating well after each addition until fully incorporated. Scrape down the sides of the bowl occasionally to ensure everything is being mixed evenly. Next, add the sour cream, the 1½ tablespoons of lemon zest, the 2 tablespoons of lemon juice, and the 1 tablespoon of lemon extract. Beat these ingredients in until just combined. You might notice the batter looks a little curdled at this stage, which is perfectly normal due to the acidity of the sour cream and lemon juice.
Combining Wet and Dry Ingredients
Now, it’s time to bring the wet and dry ingredients together. With the mixer on low speed, gradually add the dry ingredient mixture to the wet ingredients. Mix until just combined. Overmixing the flour at this stage can develop the gluten too much, resulting in a tough loaf. Stop mixing as soon as you no longer see streaks of dry flour. A few small lumps are acceptable.
Baking Your Perfect Lemon Loaf
Pouring and Baking
Pour the batter evenly into your prepared loaf pan. Use a spatula to spread it out, ensuring the top is relatively smooth. Place the loaf pan in the preheated oven on the center rack. Bake for approximately 50-60 minutes. The exact baking time can vary depending on your oven, so it’s important to check for doneness.
Checking for Doneness
To check if your lemon loaf is ready, insert a wooden skewer or a toothpick into the center of the loaf. If it comes out clean, with no wet batgin extract clinging to it, then your loaf is perfectly baked. If there is still some wet batter, continue baking in 5-minute increments, re-testing each time. Be careful not to overbake, as this can lead to a dry loaf.
Cooling the Loaf
Once baked, carefully remove the loaf pan from the oven. Let the lemon loaf cool in the pan on a wire rack for about 15-20 minutes. This allows the loaf to set up slightly and firm up before you attempt to remove it. After this initial cooling period, invert the loaf onto the wire rack and remove the pan. If you used parchment paper, you can now lift the loaf out easily. Allow the loaf to cool completely on the wire rack before glazing. This is important because a warm loaf will cause the glaze to melt and become runny.
Crafting and Applying the Lemon Glaze
Making the Glaze
While the loaf is cooling, prepare the simple yet delicious lemon glaze. In a small bowl, whisk together the 1 cup of powdered sugar, the 1 tablespoon of lemon juice, the 1 tablespoon of milk, and the 1 tablespoon of melted butter. Whisk until smooth and lump-free. The consistency should be thick but pourable. If it’s too thick, add a tiny splash more milk; if it’s too thin, add a bit more powdered sugar.
Glazing the Cooled Loaf
Once the lemon loaf has cooled completely, it’s time for the finishing touch. Place the wire rack with the cooled loaf over a piece of parchment paper or a baking sheet to catch any drips. Drizzle or pour the prepared lemon glaze over the top of the loaf, allowing it to cascade down the sides. You can use a spoon or spatula to help spread it evenly, or simply let gravity do its work for a more rustic look. Let the glaze set for at least 15-20 minutes before slicing and serving. This allows the glaze to harden slightly, creating a beautiful contrast with the moist cake. Enjoy your homemade Lemon Loaf!

Conclusion:
I hope you enjoyed learning how to make this delightful Lemon Loaf! This recipe has truly become a favorite in my kitchen, and I’m so excited for you to try it. The perfect balance of zesty lemon and sweet, moist cake makes it an absolute crowd-pleaser. It’s wonderfully versatile, shining at breakfast, as an afternoon treat with a cup of tea, or even as a light dessert.
For serving, I often enjoy my Lemon Loaf simply dusted with a bit of powdered sugar. However, it’s also fantastic with a light lemon glaze, a dollop of whipped cream, or a side of fresh berries. Feel free to experiment with variations! Adding poppy seeds to the batter offers a delightful texture and subtle nutty flavor, or you could fold in some fresh blueberries for a burst of fruity goodness. Don’t be afraid to get creative and make it your own! I encourage you to bake this Lemon Loaf soon and share its sunshiney goodness with your loved ones. Happy baking!
Frequently Asked Questions:
Q1: How should I store my Lemon Loaf?
Your Lemon Loaf can be stored at room temperature in an airtight container for up to 3 days. If you plan to keep it longer, wrapping it tightly in plastic wrap and then aluminum foil before placing it in the refrigerator will extend its freshness for about a week. You can also freeze slices or the whole loaf, tightly wrapped, for up to 3 months.
Q2: Can I make this Lemon Loaf ahead of time?
Absolutely! The Lemon Loaf actually tastes even better the next day as the flavors have more time to meld. It’s a perfect make-ahead treat for parties or busy mornings. Ensure it’s completely cooled before storing it as described above.
Zesty Lemon Loaf- The Ultimate Moist Cake Recipe
An incredibly moist and flavorful lemon loaf cake with a bright citrus glaze, perfect for any occasion.
Ingredients
-
1⅓ cup all-purpose flour
-
1¾ teaspoon baking powder
-
½ teaspoon salt
-
½ cup unsalted butter, softened
-
⅔ cup granulated sugar
-
3 large eggs
-
1 cup sour cream
-
1½ tablespoons fresh lemon zest
-
2 tablespoons fresh lemon juice
-
1 tablespoon pure lemon extract
-
1 cup powdered sugar
-
1 tablespoon fresh lemon juice (for the glaze)
-
1 tablespoon milk (for the glaze)
-
1 tablespoon unsalted butter, melted (for the glaze)
Instructions
-
Step 1
Preheat oven to 350°F (175°C). Grease and flour a 9×5 inch loaf pan, or line with parchment paper. -
Step 2
In a medium bowl, whisk together flour, baking powder, and salt. Set aside. -
Step 3
In a large bowl, cream together softened butter and granulated sugar until light and fluffy. Add eggs one at a time, beating well after each. Stir in sour cream, lemon zest, lemon juice, and lemon extract. -
Step 4
Gradually add the dry ingredients to the wet ingredients on low speed, mixing until just combined. Do not overmix. -
Step 5
Pour batter into the prepared loaf pan and bake for 50-60 minutes, or until a wooden skewer inserted into the center comes out clean. -
Step 6
Let the loaf cool in the pan for 15-20 minutes, then invert onto a wire rack to cool completely. -
Step 7
While the loaf cools, whisk together powdered sugar, lemon juice, milk, and melted butter until smooth to create the glaze. Adjust consistency as needed. -
Step 8
Once the loaf is completely cool, drizzle or pour the glaze over the top, allowing it to drip down the sides. Let the glaze set for 15-20 minutes before slicing and serving.
Important Information
Nutrition Facts (Per Serving)
It is important to consider this information as approximate and not to use it as definitive health advice.
Allergy Information
Please check ingredients for potential allergens and consult a health professional if in doubt.